A well-structured packing plan saves time, reduces damage risk, and makes settling in faster. This guide provides clear, actionable steps a moving company would recommend for an organized, low-stress move.
Plan first
- — Build a room-by-room checklist and assign target pack-by dates for each space to prevent last‑minute rushes.
- — Order supplies early: sturdy boxes in multiple sizes, dish barrels, wardrobe boxes, packing paper, bubble wrap, stretch wrap, tape, and bold markers.
- — Create a staging area in each room for packed boxes and a separate “donate/recycle/trash” zone to keep clutter from re-entering boxes.
Pack by priority
- — Start with rarely used areas: attic, garage, guest rooms, seasonal closets; leave daily-use zones for last.
- — Create one “Open First” box per room with essentials such as remotes, chargers, basic tools, shower items, and a few cleaning supplies.
- — Keep a personal essentials kit separate: medications, IDs, documents, valuables, jewelry, and a change of clothes.
Sort and declutter
- — Use the four-pile method: keep, donate, sell, discard; decide before any wrapping starts to avoid packing unnecessary items.
- — Remove duplicates in kitchens and closets first; these categories typically yield the biggest volume reduction.
- — Photograph items being sold or donated and schedule pickups ahead of moving week to keep floors clear for packing.
Box selection and weight control
- — Heavier items go in smaller boxes; lighter, bulky items in larger boxes to maintain safe lifting limits.
- — Keep boxes under 40–45 lb when possible; if in doubt, split contents rather than overloading one carton.
- — Fill voids with crumpled paper or soft items to prevent shifting and box crush.
 Wrapping techniques
| Item | Technique | Notes |
|---|---|---|
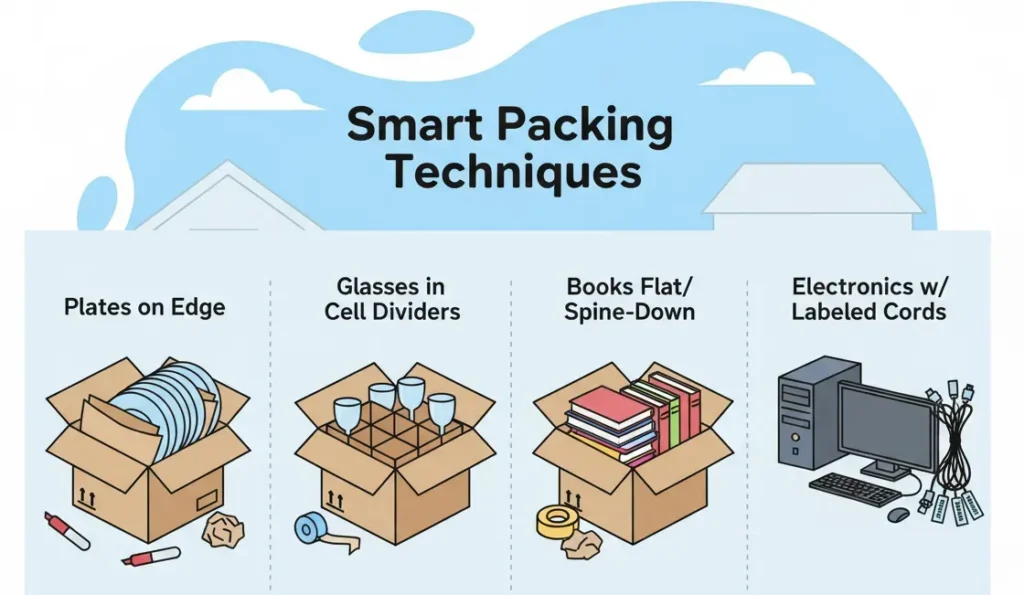
| Plates | Pack on edge, each plate individually wrapped in packing paper | Add padded layers at the bottom and top of the box for shock absorption |
| Glasses & stemware | Wrap each piece and place upright in cell dividers or dish‑pack boxes | Cells prevent contact and reduce breakage risk during transit |
| Books | Pack flat or spine‑down in small boxes | Interleave paper between valuable covers to prevent scuffing |
| Electronics | Photograph cable connections; coil and label cords in Zip‑top bags; use original packaging when possible | Keep accessories with the device; add anti‑static or foam padding around components |
 Furniture prep
- — Disassemble only what improves safety or space efficiency: table legs, bed frames, modular shelves. Keep hardware in labeled bags taped to the main piece.
- — Wrap wood and finished surfaces with moving blankets, then secure with stretch wrap to avoid tape residue on finishes.
- — Use mattress bags, sofa covers, and corner protectors; add cardboard edge guards for glass and framed art.
 Labeling for speed
- — Label at least two adjacent sides and the top with room, contents, and handling notes (e.g., “Kitchen – Glassware – Fragile”).
- — Color-code by room using tape or stickers; match colors to door frames at the destination for faster placement.
- — Number boxes per room (e.g., “Bedroom 2: 1 of 6”) and maintain a simple inventory list in a shared note or spreadsheet.
 Safety and access
- — Keep clear walkways; stack heaviest boxes on the bottom, lighter on top, no stacks above shoulder height.
- — Pack a separate “Tools and Setup” tote: box cutter, hex keys, screwdrivers, furniture pads, felt sliders, and extra tape.
- — Prepare building access: reserve elevators, measure doorways and halls, and secure parking for the moving truck.
 Specialty items
- — Art and mirrors: use picture boxes, tape an X on glass with painter’s tape to reduce shatter spread, and pad with foam corners.
- — Rugs: vacuum, roll pile-in, and wrap in plastic; label the room and orientation (“window side”).
- — Appliances: defrost refrigerators 24 hours prior, drain washer hoses, and secure moving parts per manufacturer instructions.
 Load strategy
- — Load heavy, dense items first to the front of the truck or container, distributing weight evenly left-to-right and front-to-back.
- — Create tight tiers with square walls; fill gaps with soft goods and labeled “light” boxes to minimize movement.
- — Keep “Open First” boxes and tools last-on/first-off for immediate access at the new home.
 Arrival and setup
- — Place boxes directly into their labeled rooms to eliminate double handling.
- — Assemble beds first, then set up the kitchen basics; this prevents fatigue from delaying essential comfort.
- — Cross-check the box inventory count as items enter the home and flag any damages for prompt follow-up.
 Quick supply checklist
| Small, medium, large, and dish-pack boxes |
| Wardrobe boxes and hanging bar |
| Packing paper, bubble wrap, foam sleeves, stretch wrap |
| Heavy-duty tape with dispenser, painter’s tape for notes |
| Moving blankets, corner/edge protectors |
| Zip-top bags for hardware, cable ties, markers, color labels |
Well-planned packing transforms moving day from chaotic to controlled. With smart sorting, the right materials, and disciplined labeling, setup in the new space becomes faster and far less stressful.

Download Practical Packing Tips for an Your Organized Move
Contact us:
Phone: +1 (888) 711-4778
Email: [email protected]
Address: 808 Ahua Street, Honolulu, HI 96819


